
How to Use a Knitting Belt
For those of you who have purchased a belt, but have no one to teach you how to use it, or for those of you who are curious about the method used with a knitting belt, here are some instructions you may find helpful.
How to Wear the Belt:
A knitting belt is traditionally worn at the right side of the waist, but can also be positioned lower on your hip. Fasten the belt firmly so it will not move as you work.
The unique, patented Studio PoK knitting belt has a stiffened, curved underside, which makes it very stable; it stays in position as you work and is extremely comfortable to wear. Insert the tip of a double point needle into one of the holes in the pad and adjust it to whatever angle and height is comfortable for you; if necessary, select a different hole.
The tips of the needles should meet in the center of your body. Move the pad further out to the side of your waist or hip for longer needles, or closer to the center for shorter ones. The length of the needle can also be adjusted by how deeply it is pushed into the horsehair. When you insert the needle into the pad, angle it higher or lower, closer or farther from your body, as necessary in order to work in a comfortable position with your wrists straight, your shoulders down, and your elbows tucked against your body at your sides.
When the belt is worn at the waist, the work can be held somewhat higher, making it easier to see the stitches and hold your head in a more upright position. If you experience any fatigue with your arms and hands held higher, change the angle of the needle to lower the work closer to your lap.
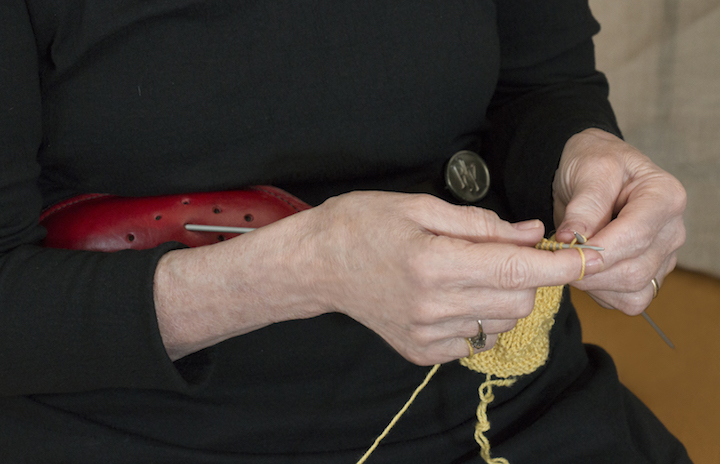
Wearing belt at waist
With the belt worn lower, the growing fabric can be supported in your lap, which reduces the weight. However, the work will be farther from your eyes and you may need to lower your head in order to look at what you are doing; for some people this can cause neck strain; change the angle of the needles to find the most comfortable position.
Needles
A knitting belt requires the use of double point needles. You can use any length needle but due to the nature of the horsehair and the size of the holes in the pad, size is limited to no more than 3.5mm (an American 6). Metal needles are required because they are subjected to some pressure as you work and those made of wood or bamboo are likely to break.
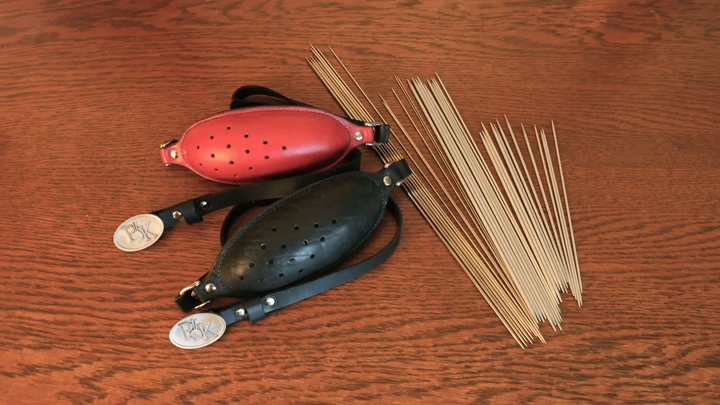
Needles of various lengths can be used with a knitting belt.
Short needles, suitable for socks or mittens work fine, but because some of the needle will be inserted into the leather pad, the 15mm, 8″ ones are recommended. Also, when working on small items like this, it helps to move the leather pad closer to the center of your body and perhaps wear the belt higher so the stitches are easier to see.
I prefer 30cm needles (about 12”), like the Prym aluminum double points that we sell in our shop. This length accommodates quite a large number of stitches but for a large garment, they can be divided onto two or more needles as you would for a sock. This can also be done when working flat; the needle not in use rests in your lap.
Knitters in Shetland commonly work with 40cm steel needles (nearly 16”), with the pad positioned at the far right of the waist In order to center the working tips. The needle is pushed deeply inside the horsehair in order to shorten the length, and it is angled close to the body at about the same height as the pad. They often use just three needles when working a garment in the round; the stitches are distributed half and half to two of them; the third is the working needle. Longer needles work best for this purpose because they hold more stitches. This length needle is difficult to find; we now carry Addi 40cm aluminum needles in our shop.
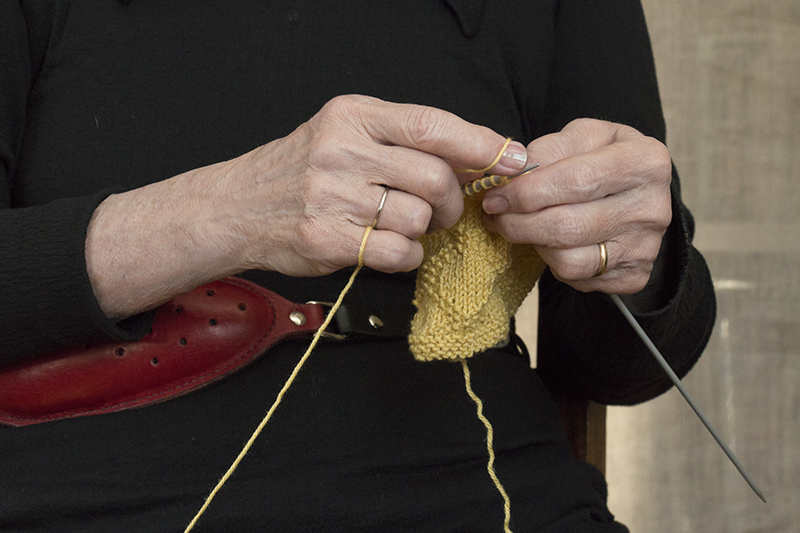
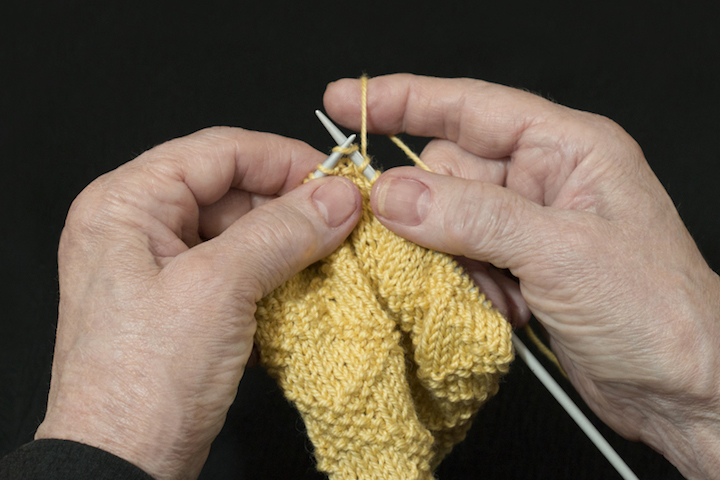
Holding the Yarn:
The yarn is tensioned as it would be for Right Finger Knitting. The most common method of doing this is wrap the yarn once around the little finger, across the palm, up between forefinger and middle finger and over the forefinger to the stitch on the needle, but you can hold it in any way that gives you good control and doesn’t require that you readjust it frequently.
The forefinger acts as a shuttle to wrap the yarn around the needle for each stitch, while the fourth and fifth fingers are curled into the palm and control tension.
Yarn wrapped on right hand for tension.
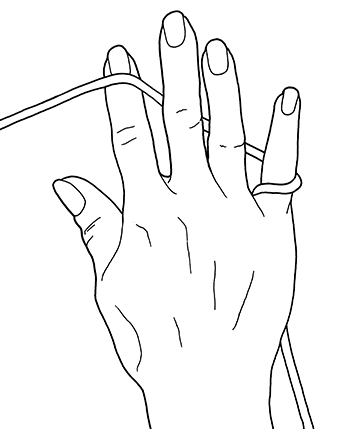
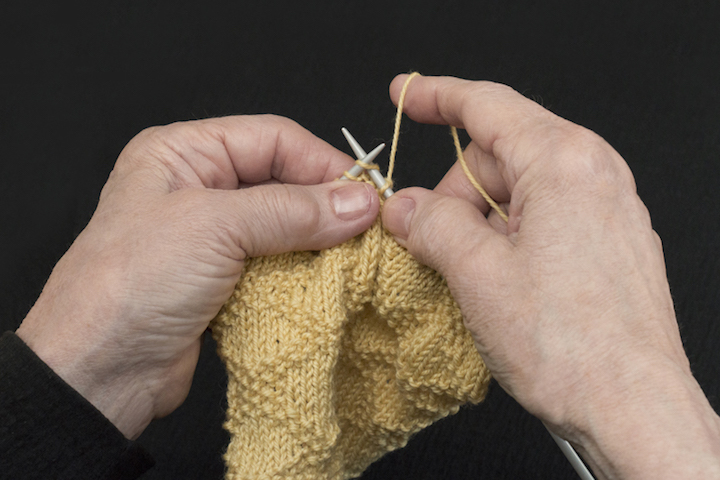
Hand Position:
Only the thumb and middle finger of your right hand are in contact with the needle, perched on the top like a bird on a branch, about an inch back from the tip.
These fingers serve to maintain the correct position of the hand, which is held just above the needle and parallel to it, and act as a fulcrum, a secure point around which the motions used to wrap the yarn take place. They are also used to continuously move the new stitches down the needle, away from the tip.
The default, or resting position for the shuttle finger is on the farside of the needle, it “rests” against the yarn at all times to keep it slightly taut. If necessary, adjust the length of the yarn from the needle so your finger can clear the tip when wrapping it for each stitch; in some cases, you may want it longer to make stitch manipulation easier, or keep it shorter for additional speed.
Working with longer strand
If the belt is at the waist, the hand is held lower, close to the needle, and the yarn to the forefinger is shorter. This produces a greater economy of motion and increases speed, especially for the Knit stitch. When holding the yarn this way, you may find it comfortable to rest the heel of your hand on the needle, or your forearm on the pad of the knitting belt.
Working with shorter strand
If you have difficulty holding the yarn on your forefinger, perhaps because you are unfamiliar with that method, or because you have some impairment that makes it difficult, you can also use the Right Hand Method, with the yarn held between thumb and forefinger, see Principles of Knitting, pages 6-7. This is also a good option if you are working with a difficult yarn that does not flow through your hand at an even tension, such as one that is slippery or highly textured.
Try different options; wear the belt higher or lower, and hold your forefinger closer or farther from the needle tip until you find what works for you and for a particular project. In all cases, it is important to keep your shoulders down and your arms tucked in at your sides to reduce fatigue, and whatever you do, don’t be tempted to hold the needle; leave that to the belt!
To Knit:
Because the pad holds the right needle in a fixed position, stitch manipulation is done entirely with the left hand and needle.
Hold the left needle with the tip pointing up at a slight angle. Place your left thumb just below the crossed needle tips to support them and position your left forefinger against the first stitch on the farside to stabilize it as you work.
Move the left needle into position so the right needle tip is below it and to the left of the first stitch. Slide the left tip to the nearside, allowing the right tip to enter the stitch from left to right.
Wrap the yarn in the usual way for Knit, and then use the left needle tip to lift the stitch over the right tip and discard it on the farside. If necessary, This finger can also be used to give the right needle tip a little nudge to help it exit the stitch.
As you can see, instead of inserting the right needle into a stitch, the left needle is used to place a stitch on it. Instead of moving the right needle out of a stitch to discard it, the left needle is used to lift it off. It is not necessary to move your left hand very much at all. Use a slight up and down movement of your forearm, keeping your wrist perfectly straight.
To Purl:
Position the tip of the left needle a little lower for Purl than for Knit; this angle makes it easier to put the stitch on the right needle.
Move the left needle so the right needle tip is positioned under it, just to the right of the first stitch. Slide the left needle to the farside so the right needle tip enters the stitch from right to left.
Use your shuttle finger to wrap the yarn under the needle to the nearside, then back over the needle to the default position on the farside again, then use the left needle to lift the stitch off the needle to the nearside and discard it.
The right needle tip is a little farther away when wrapping the yarn for Purl than it is for Knit, and you may want to rotate the back of your hand slightly to the nearside to reduce the distance your forefinger has to travel.
Also note that the the right forefinger is held farther down to the right than it is for Knit; this is necessary in order for the yarn to move past the tip of the left needle after it has been wrapped on the needle.
Notice how similar purling is to knitting. Because the motions used to work these two stitches are nearly identical, you will find it easy to achieve the same speed and even tension for Purl as for Knit.
Mixed Knit and Purl
It is also easy to combine the two stitches such as for a ribbing or a brocade pattern. The motion used to bring the yarn between the needles when changing from Knit to Purl is almost the same as the one used to wrap the yarn for a stitch. In fact, when you watch someone work this way, it can be difficult to tell when they are knitting or purling, or just moving the yarn.
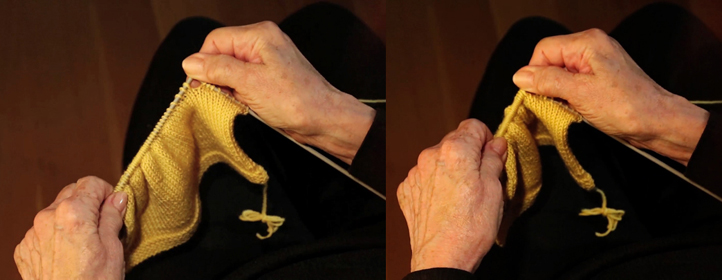
Stitch Technique
Because the yarn is held away from the needle on the farside, you will find that there is a clear view of the stitches when working any complex technique. If necessary, pull the fabric down slightly, with your left fingers to open up the first stitch or two, making it easier to insert the needle, as shown here for a Right Decrease.
Starting a New Row:
After making a first stitch, immediately capture it with your right thumb and pull it down the needle slightly as you work the next few stitches. Maintain the tension on it until your middle finger can join your thumb.
Tips:
Here are a few tips for working this way:
* To minimize bumping your shuttle finger on the needle tip, place the stitch on the needle just where the tip meets the shaft so it doesn’t stick out too far.
* To provide adequate yarn to each stitch so it is not too tight, before discarding, use the left needle tip to slide the new stitch down the right needle shaft slightly. This also helps move the new stitches down the needle, leaving room for the next ones closer to the tip.
* Use your right thumb and middle finger to continuously “walk” the new stitches down the right needle shaft so you can keep going until you have worked all or most of the stitches packed together on the left needle.
Charge the left needle with a compact group of stitches so you have plenty to work with.
* To reduce the number of times you have to stop and rearrange things, charge the left needle with a group of stitches packed tightly together near the tip — about as many as will fit in the palm of your hand. To hold them in position, press the heel of your hand down on the needle to the left of the group, and use your thumb and forefinger to keep them under control at the tip, releasing one at a time for transfer to the right needle. Draw out more yarn from the ball than you normally would so you have plenty to work with.
Changing Needles:
At the end of a row, remove the right needle from the pad. Be careful. It is tempting to grasp the needle close to the pad to pull it out, however, you risk sliding the stitches off, leaving the needle behind.
To avoid this, hold the tip of the needle with your left fingers as you draw it out of the pad with your right hand. Insert the empty needle into the pad to begin the next row, and then transfer the needle bearing the stitches to your right hand.
To remove needle from belt, grasp tip with left fingers and push needle out with right fingers.
Walking Around:
If you need to get up for some reason, leave the needle in the pad. Rotate the left needle over to the right and insert the tip of it into one of the other holes, push the stitches down the needle a bit, grab the ball, and you are ready to go.

If you want to walk around put both needles in the belt.
Working in the Round:
You will find it easier to make small items in the round with this method because your right hand is above the needle and your fingers are not within the circle.
Use sets of four or five needles in the normal way for making a sock or a mitten, or use three needles as they do in Shetland, two for the stitches and one to work with.
At the end of a row, transfer the empty needle to your right hand. Remove the needle bearing the stitches from the pad and let it hang to the right. Insert the empty needle. into the pad and pick up the next needle in your left hand.
To work the first stitch on a needle, position the tip of the empty needle on top of the one to the right. Arranging the needles this way shortens the running thread between the previous needle and the next one, reducing the possibility of having a ladder in the fabric.